Liberty V-12 Battery Maintenance
THE BATTERY
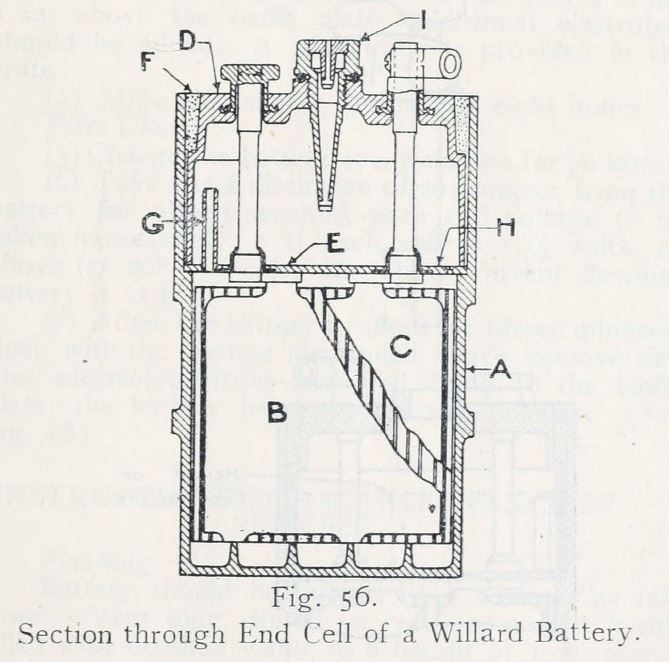
The standard 8-volt Liberty battery. of Willard or Exide make consists of four cells in a one-piece ebonite box, measuring approximately 5 1/2 in. long by 3 3/4 in. wide by 6 3/4 in. high to top of terminals. The battery is of the so-called "unspillable" type, but is not absolutely so: it is quite sufficiently so for all practical purposes, however. Fig. 56 shows a section through an end cell of a Willard battery with the cable terminal and vent plug in place. The ebonite box A is moulded with ribs, upon which the plates B-C rest, with a fair amount of sludge space below them; it is provided with a main lid D, and a baffle plate E, sealed in with the usual compound at F. The baffle plate has a standpipe vent at G, and a small acid drain hole at H: the filler vent plug I screws down on a rubber joint ring, and is sufficiently long to stand above the electrolyte if the battery is turned upside down until all the acid has drained from the main compartment in which the plates are. The normal acid level is just below the baffle plate, and one cannot judge by mere inspection whether there is plenty of acid or a considerable shortage.
The makers' detailed instructions for care of these batteries are as follows : —
INSTRUCTIONS FOR PREPARING BATTERY
FOR SERVICE.
Filling.
(1) Remove the vent plug.
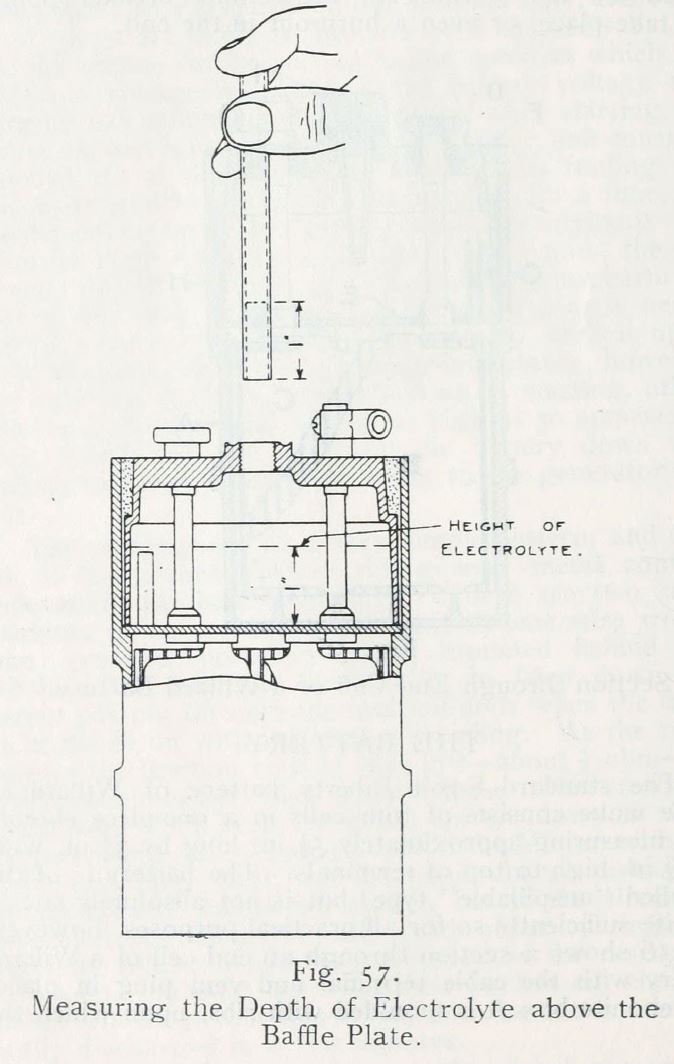
(2) With the syringe provided in crate, fill each cell to a depth of 1 in. over the baffle plate (see Fig.. 57) with electrolyte taken from the glass bottle provided in crate.
(3) After fifteen minutes, check to see that electrolyte is I in. above the baffle plate (using a glass tube as shown in Fig. 57). If the electrolyte is not 1 in. above the baffle plate, additional electrolyte should be added. A glass tube is provided in the crate.
(4) Allow the battery to cool for eight hours.
First Charge.—
(5) Charge the battery at 0.7 ampere for 70 hours.
(6) Take a test discharge of 20 amperes from the battery for fifteen seconds, each cell voltage to be taken immediately. If each cell is 1.55 volts, or above (at 800 F.), with the above current flowing, battery is O.K.
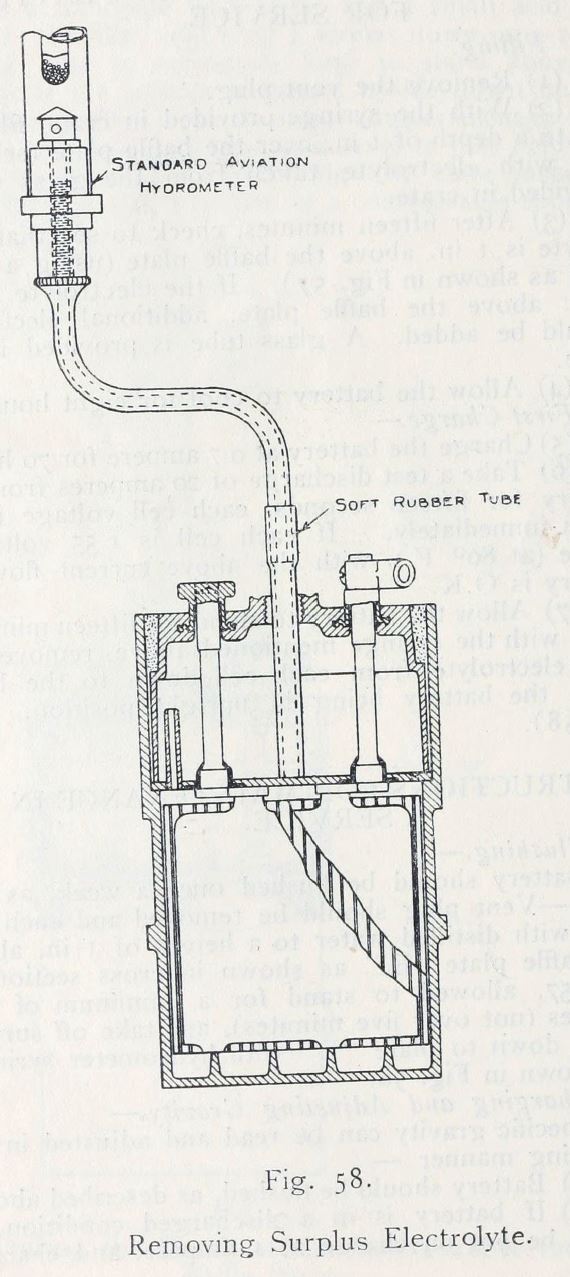
(7) Allow the battery to stand for fifteen minutes: then, with the syringe mentioned above; remove surplus electrolyte from each cell down to the baffle plate, the battery being in upright position. (See Fig. 58).
INSTRUCTIONS FOR MAINTENANCE IN SERVICE.
Flushing.—
Battery should be flushed once a week, as follows : —Vent plug should be removed and each cell filled with distilled water to a height of 1 in. above the baffle plate "E," as shown in cross section of Fig. 57, allowed to stand for a minimum of two minutes (not over five minutes), and take off surplus water down to plate "E" with hydrometer syringe. as shown in Fig. 58.
Charging and Adjusting Gravity.—
Specific gravity can be read and adjusted in the following manner : —
(1) Battery should be flushed, as described above.
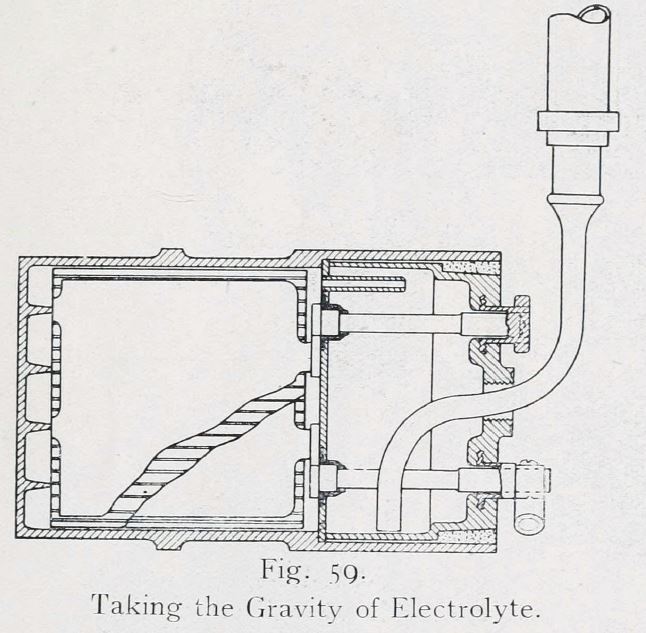
(2) If battery is in a discharged condition, it should be put on charge at 1 ampere, and charged until the terminal voltage with this current flowing has risen to a maximum, i.e., shown no rise for a period of one hour. (Vent plug should be left out during this charge.) The battery should then be tipped on its side and gravity taken with the hydrometer provided with a bent, hard rubber tube, as shown in Fig. 59. Be sure to return electrolyte to the cell from which it was taken.
In batteries fully charged, gravity should be between 1.290 and 1.310. If gravity is not correct on taking gravity readings, battery should be held upside down for five or six minutes and electrolyte allowed to run into a rubber or glass jar. The electrolyte removed should be adjusted to 1.300 specific gravity by the addition of distilled water, or 1.400 acid, as the case may be: then each cell should be filled with this electrolyte until the level is 1 in. above plate "E" as shown in Fig. 57. Battery should then be allowed to stand a minimum of five minutes (not more than ten minutes), and surplus electrolyte removed to top of plate " E " with hydrometer syringe, battery in upright position. Replace vent plugs.
FITTING THE BATTERY.
The battery should be fitted in a wooden outer box, and secured against movement by suitable packing of rubber strip or hosepipe in short lengths; it should be held down by buffers pressing upon the lead connecting lugs between the cells.
The cable terminals are of a rather unsatisfactory pattern, and need careful treatment to avoid permanent damage to the lugs on the cells. The cables must be well sweated into the thimbles, and the latter should be disturbed as seldom as possible, to reduce wear and tear.
The battery connections are, positive to the terminal at back of switchboard marked "POS. BATT.", and negative to earth upon the engine, preferably on one of the studs fixing the generator. They are to be made with flexible cable of not less than 110/36 or 64/33 conductor; a special cab-tyre sheathed cable of 6 mm diameter will eventually be supplied for the purpose, the same cable being used also for the lead which connects the three terminals marked "GEN. ARM." on the generator, voltage regulator, and switchboard respectively.
- - - - - - - -
The possibility of trouble can be reduced to a minimum by the exercise of care in the daily routine inspection, and by cleanliness throughout. The detailed instructions for the maintenance of the battery should be carefully followed, as the amount of electrolyte is so small that there is no margin for neglect. The distributor heads should be removed daily, and the brush tracks wiped with a soft rag and a little petrol- At the same time the contact breakers should be dusted with a soft brush, and once a week the lever pivots should have a drop of oil. Otherwise, practically no attention is needed, and the contacts should run for many hours without requiring adjustment.
DAILY ROUTINE
1. Take the voltage of the battery before each day's flying. On open circuit—that is to say, with both ignitions switched off—the voltage should not be less than 8 volts; with one ignition switched on, and the ammeter showing a discharge of from 4 to 5 amperes, the reading should be not less than 7 1/2 volts. Should the Voltages be lower, a freshly charged battery should be fitted.
2. Remove and clean the plugs, and set their gaps to 0.015 in., renewing any plugs that appear to be of doubtful soundness.
3. Remove the distributor heads and examine the contact breakers. The gap should be between the limits of 0.010 and 0.013 in., and the points should meet squarely.
4. Clean the carbon brush tracks of the distributors with petrol on a piece of cloth. Do not use any abrasive material.
5. Run over all leads, especially those on the engine, examine— for deterioration from oil or burning, and see that all terminals are tight.
6. Before starting the engine, switch on each ignition system separately, and note the ammeter readings, which should be approximately equal. It may be necessary to turn the engine a few degrees backward, in order to bring the main contact breakers to the closed position before the full current can flow. Should one system show no discharge reading, there is a break in the circuit, probably due to a loose terminal or very dirty contacts. Should one show an excessively high discharge, there is a partial short circuit somewhere. To detect a short in a coil as distinct from the wiring, change over the primary leads to the distributor heads.
7. Immediately the engine stops, put both ignition switches to the OFF position.
WEEKLY ROUTINE
1. Flush the battery as already detailed, and correct the acid density if necessary. Wipe the battery dry and clean from acid, and smear a little vaseline on the terminals before replacing it. Wipe out the battery box.
2. Remove the dust cover from the generator brush gear, dust the commutator, etc., and, if necessary, clean with petrol. See that the brushes are in order, and put a few drops of thick oil on the bail bearing at the top of the armature spindle.
3. Clean out the contact breakers, and put a drop or two of oil on the pivot bearing of each lever. Check and readjust the points if required. The amount of slack in the driving coupling should not allow of more than about 1/16 in. of play at the end of the distributor rotor.
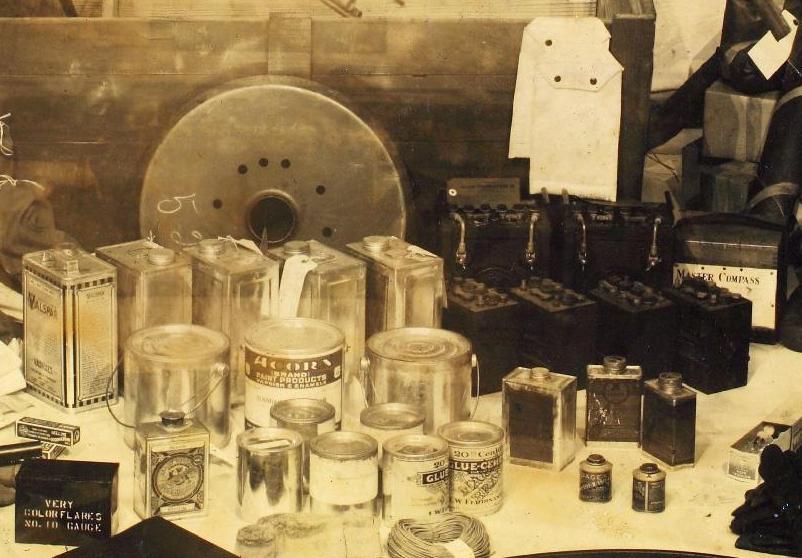
Some of the spare batteries carried on the Douglas World Cruiser Expedition 1924.
-- end --