pilotfriend.com - Stearman
Stearman YPT-9 - Budd Davisson - A Different Kind of Stearman
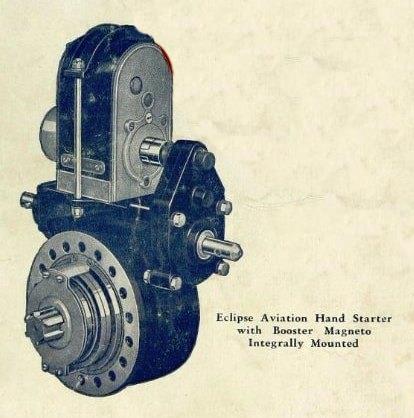
As we got ready to fly, Luft got into his flying jacket and walked forward to start cranking up the inertial starter. I lost count of the number of times he turned the crank to energize the starter's fly wheel, but it was around 50, with the last 10 merely picking the airplane up off the ground. I was strapped in the back pit and once the starter was cranked up, it ran long enough for Luft to leisurely walk back and show me how to start it. With mags on "left," I jerked the handle that engaged the starter, pushing a button marked, "booster" at the same time. The booster was a coil that fed extra spark into the system for starting.
As the starter engaged, it made a sound that can be described only as beautiful. The high-pitched whine of the fly wheel dropped sharply as the clutch engaged with the engine and the geared starter turned it over. One blade came by, then two. It belched a little blue smoke and coughed its way to life. Inertial starters may be a pain, but they're almost worth having just for that sound.
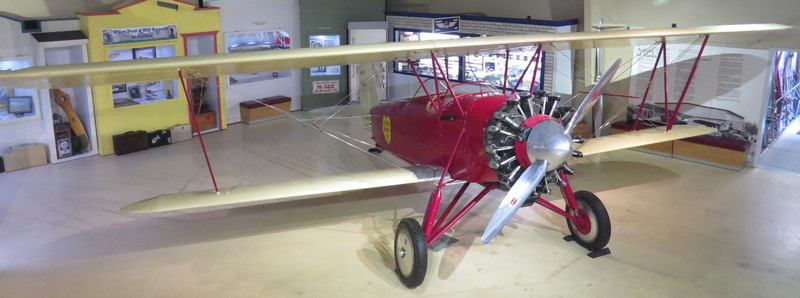
Stearman N5415 that you see here in Hanger 1 was built in the first
year of production, 1928. It was first sold on April 13th, 1928 to
Walter Varney in San Leandro, CA without an engine. The equipment
that was installed included a flight indicator, a Waltham 8 day
clock, a speed and drift indicator, navigation lights with battery
container, wiring and equipment for landing lights and Wiley flares.
Many early aircraft had 2 or 3 flares mounted inside the wing with
an easily dislodged cover on the underside. If a pilot was flying at
night and had an engine failure or other emergency, he or she could
cause the flares to be released and illuminate the ground below the
plane.
Principals of Engine Starting
Stearman Restorers Association
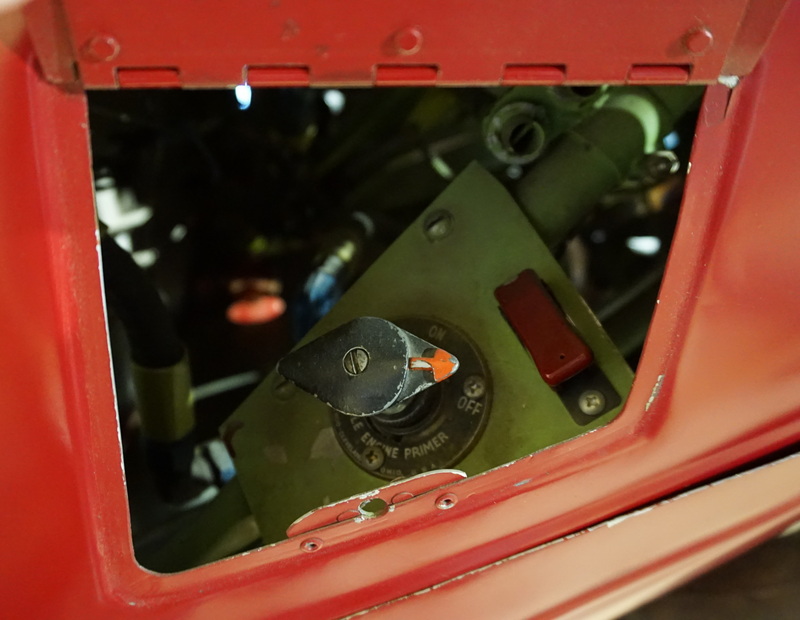
In talking to a large number of Stearman owners, there is a wide variation in the procedures and sequences used in starting the radial engine.
The parts of the procedure include:
- Turning the prop through to check for hydraulic lock (fuel and/or oil lock)
- Additional turning of the prop through
- Priming
- Turning the prop through after or during priming
- Turning on the Starting Coil
- Turning on the mags, left, right or both
- Position of the throttle and operation of the throttle
A few of the principles that are involved: For the fuel in the cylinder to ignite, there must be atomized fuel, compression and a spark from the plug. The energy in the spark from a mag will depend on how fast the engine is turning, since there is no accelerator mechanism in the Stearman mag which provides a hotter spark when turning at slower speeds via a “snap forward” mechanism.
The speed of rotation of the engine will depend on the charge in the battery driving the direct drive starter, or the speed of the inertia wheel on an inertia starter induced by the electric drive motor or the hand crank. A starting coil provides a retarded and hot spark from the get-go. The fuel introduced into the cylinder has to be atomized by the primer action. With a fuel pressure pump and an electrically actuated primer, this is automatic. With a hand primer, the primer plunger has to be pushed in firmly and all the way (read hard!).
The primer orifices in the cylinder have about a .020 hole in order to accomplish the atomization. The .020 hole and the fuel lines leading to them in the top cylinders have to be clear. Liquid fuel injected into the cylinder won’t ignite – either right away or later. The primer has to be locked after the last push-in. Turning the engine through AFTER priming results in the atomized fuel cloud being pumped out through the exhaust valve and into the exhaust manifold. Then it is no longer available in the cylinder for ignition and starting, but is available in the exhaust manifold for ignition and loud noises, and the possible failure of magneto drive gears.
Turning the engine through with the starter, and the mags “OFF” and no starting coil, has the same result as item #4 above. If it were not removing the primed fuel cloud from the cylinder, it could help a bit by allowing the engine rotation to speed up some. The atomized fuel from the primer will start to condense inside the cylinder, so you need to hurry the process after the priming is done.
The throttle needs to be just a bit off of the stop. Pumping the throttle and hence the accelerator pump, just tends to put liquid fuel into the intake manifold and on the ground with the chance of a backfire followed, maybe, by a “big explosion.” A feel for pumping the throttle as the engine starts to fire has to be developed by the pilot.
Considering and buying into all of the above, starting would be best done by having the mags and hot coil “ON”, energizing the starter, and then priming as the engine is turning. If priming has to be done separately and before anything else, push the primer hard (don’t forget to lock the primer), minimize delay (read hurry), turn on both mags and the hot coil, if there is one, position throttle 1/8 to ¼ inch off the stop, and energize the starter. Pump the throttle gently and artistically only when the engine starts to fire. After the engine is running, turn off the hot coil if it is on a separate switch. It is better for the hot coil to be on when the starter is energized and goes off when the starter is deenergized.
By Jack Davis|July 24th, 2016|Flying-Wire|Comments Off
Cold Weather Engine Starting
Aero Digest - December, 1926 - Page 440
By G. 0. Noville
Lubrication Engineer,
Byrd Arctic Expedition

Of the many problems that had to be solved to insure the success of the flight of the Byrd Arctic Expedition to the North Pole one of the most important was that of starting and lubricating the three Wright J4 air-cooled engines in the low temperatures encountered.
Preheating the oil was a simple matter and the same procedure was adopted as had previously been employed in Alaska, Greenland and Labrador on the U. S. Army Round-the-World Flight and on other flights where low temperatures were encountered. Gargoyle Mobiloil "B" was supplied in five gallon cans by the Vacuum Oil Company and a requisite number of these were placed in a circle around an open wood fire. The cans were rotated so that the contents became thoroughly heated.